
Step 1: Form Cross
In this step, you have to form a cross on the D-face. I prefer to make a white cross because it stands out more from the other colors so it is easier to find. From now on, the rest of the guide will refer to white as the cross color. If you do a cross with a different color, just change "white" to your color.The four edge pieces that are used to form the cross have a specific place. The color other that the color of the cross has to match with the color of the center of the face it is in.
| Good Cross | Bad Cross |
|---|---|
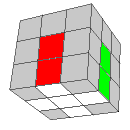  |  |
| The red-white edge piece lines up with the red center. The green-white edge piece lines up with the green center. The orange-white edge piece lines up with the orange center. The blue-white edge piece lines up with the blue center. | The red-white edge piece does not line up with the red center. The green-white edge piece does not line up with the green center. |
With practice, you should be able to solve the cross very fast. The most important thing to be able to consistently from the cross is practice, practice, practice. If you are stuck or need help, check out Dan's CubeStation's page on solving the cross for more info.
2. FL Corners (Memasukkan corner) :
Step 2: Insert First Layer Corners
The cross comprised the four edges of the first layer. In this step, you have to put in the corners. Just like the four edge pieces used to form the cross, the four corners have specific positions. Holding the cube so the cross is on the bottom, find a corner cubie in the top layer that has white on one of its three stickers. Look at the other two stickers of that corner piece to determine where in the bottom layer it has to go. Turn the top layer so that that corner is directly above its designated location. This is that start position.You have to do this to all four corners. In all these five states, there is a solved cross in the D-face. These moves should not be considered algorithms. Do these moves slowly and watch carefully to see how the corner gets placed in.
| State 1 | State 2 | State 3 | State 4 | State 5 |
|---|---|---|---|---|
| | | | | |
| To insert corner: F' U' F | To insert corner: R U R' | To state 2: R U2 R' U' | To state 2: R U R' U' | To state 1: F' U' F U |
When you are done, your cube should look like this:
3. Memasukkan edge / Second Layer (yg tak berwarna kuning) :
To put the second layer edges in, find an edge in the top layer that does not have yellow (or your top-layer color) on either sticker. That edge will have two stickers - one in the U-face, and one on the side face. Look at the color of the sticker on the side, and turn the top layer until that sticker matches the color of the center directly under it.This is the start position.
| State 1 | State 2 | State 3 |
|---|---|---|
| | | |
| U' F' U F U R U' R' | U R U' R' U' F' U F | Do either the algorithm for state 1 or 2 to get the piece out, and then do the correct algorithm to put the piece back in correctly. (lakukan salah 1 algo di samping) |
When you are done, your cube should look like this:
4. OLL Edge orientation :
Step 4: Orient Last Layer Edges
From this step on, you will be using algorithms. Don't worry if you do not understand how they work. The important thing is that they work.In this step, you have to form a cross on the U-face. Unlike the cross you made for the first layer, the position of the four the edges do not matter. There just has to be a cross.
| State 1 | State 2 | State 3 | State 4 |
|---|---|---|---|
 |  |  |  |
| You're done! Go to the next step. | F U R U' R' F' | F R U R' U' F' | Do either the algorithm for state 1 or 2. When you are done your U-face should now look like state 1 or 2 |
5. OLL Corner's :
Step 5: Orient Last Layer Corners
The goal for this step is to completely solve the top face so that it is all yellow. You do that by twisting the corners, three at a time. Don't worry about the sides of the top layer. That will be fixed in the next two steps.There are seven possible orienting last layer corners states. The two algorithms for the first two states can turn three of the four corners clockwise or counterclockwise. For states 1 and 2, this step it easy. Just do the algorithm and move onto the next step. For the rest, it is a little more challenging.
The goal for states 3 to 7 is to strategically twist three corners, using one of the two algorithms, so that you result in state 1 or state 2. Then that can be solved using the algorithm for that state. The way to do so is explained below.
3 Wrong Corners
These are the simplest. Just use the algorithm provided for the case you have. In the first state, the three corners need to be rotated clockwise. In the second, the three corners need the be rotated counterclokewise. Notice that the algorithm for state 2 is just the algorithm for state 1 backwards.| State 1 | State 2 |
|---|---|
 |  |
| R U R' U R U2 R' | R U2 R' U' R U' R' |
4 Wrong Corners
For these cases, two corners need to be rotated clockwise, while the other two need to be rotated counterclockwise. Hold the cube as shown in the diagrams for states 3 and 4. Notice the two yellow stickers on the top layer of the left face. Make sure they are, then do the algorithm for state 1. You should now have state 1.| State 3 | State 4 |
|---|---|
 |  |
2 Wrong Corners
For these cases, one corner needs to be rotated clockwise and the other needs to be rotated counterclockwise. Find the one that needs to be twisted counterclockwise. Hold the cube so that that corner is located at the bottom left corner of the top layer. There should be a yellow sticker on the front-face side of the front-up-left corner. If you have done the set-up correctly, your cube will match one of the three states below. Do the algorithm for state 1. Now it should have state 2.| State 5 | State 6 | State 7 |
|---|---|---|
 |  |  |
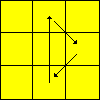
6. PLL Corner :
Step 6: Permute Last Layer Corners
Now you will have one of the two states below. Either the two correct corners are adjacent to each other (and therefore the two that need to be swapped are adjacent too), or the two correct corners are diagonal from each other (and the two that need to be swapped are diagonal too).
The corners that need to be swapped have arrows pointing to them. Therefore, the two correct corners in State 1 are the two on the right side, and the two correct corners in State 2 are the bottom-left and top-right ones. (Actually for state 2, the algorithm would still work if the two correct corners were at the top-left and bottom-right instead.)
Note:Remember that 'B2' is to turn the BACK side twice, not the bottom. The correct letter to turn the bottom side is 'D.' ('D' stands for "down.")
| State 1 | State 2 |
|---|---|
 |  |
| R2 B2 R F R' B2 R F' R Then do U to correctly align the four corners. | Do the algorithm for state 1 and it should look like state 1. |
7. PLL Edge (last step) :
Step 7: Permute Last Layer Edges
Yay! Last step! And this is proabably the easiest step too! The states are very straightforward.There are 4 possible states for permuting the edges. Two algorithms are needed. The algorithm for state 2 is almost the same as the one for state 1, except for the second turn and second-to-last turn.
Be careful on the B and B' turns. Don't mix those two up. Remember that in the notation used, you pretend you are looking at the face you are turning to determine which way is clockwise and which is counterclockwise. Therefore, a B will look counterclockwise from the front, but if you were to turn the cube around and look at it from the back, the move would be clockwise. The same thing with B'.
| State 1 | State 2 | State 3 | State 4 |
|---|---|---|---|
 |  |  |  |
| R2 U F B' R2 F' B U R2 | R2 U' F B' R2 F' B U' R2 | Do an algorithm for state 1 or 2 and it should look like state 1 or 2. | Do an algorithm for state 1 or 2 and it should look like state 1 or 2. |
WARNING WARNING WARNING (my previous math teacher said that a lot, and according to my friends who have him this year, he still does =D): Don't play with it in class (assuming that you are in school) unless you have one of those nice teachers. I got my cube confiscated twice. :D One was in 7th grade, because my friend was playing with it after school in my teacher's class when he was supposed to be working. As of right now (10/2/07), I can't remember when the second time was.


